Monday, May 21, 2012

Leap Motion Announces New Rival to the Kinect

Leap Motion Announces New Rival to the Kinect:

Well, this is interesting. A startup called Leap Motion has announced a new gestural controller which they claim is more accurate than the Kinect, and sells at an even lower price point ($70!). From Edgadget:
It’s about the size of a pack of gum, and once connected to your computer via USB, it creates a four-cubic-foot virtual workspace. Within that area, it tracks all ten of your fingers simultaneously to within 1/100 of a millimeter — that level of accuracy allows for rudimentary gestures like pinch-to-zoom and more complex actions like manipulating 3D-rendered objects. Naturally, the company isn’t telling much about the black magic making it happen, but Leap Motion claims that its software can be embedded in almost anything with an onboard computer, from phones to refrigerators. Users can customize it to suit their needs with custom gestures and sensitivity settings, in addition to chaining multiple Leap devices together to create a larger workspace. Plus, Leap Motion has created an SDK for devs to create Leap-compatible applications and an app discovery platform to distribute them to others. That means the Leap can work in a variety of use cases, from simply navigating your desktop to gaming and computer-aided design. The best part? Leap brings you this next-gen UX for a mere $69.99, and a select few can pre-order them now, with the full roll-out coming this winter. Full details follow in the PR below, and you can see the Leap in action in the videos after the break.
It’s nice to see them leading with an SDK — the Kinect, which was marketed originally as a game controller, did not have an SDK at launch — but I haven’t been able to figure yet what (if any) restrictions there are for developers. Hopefully, the terms will be more free than the Microsoft SDK.
Anyway, it sounds like it might be fun to play around with. Leap Motion claims the device: “creates a 3D interaction space of 4 cubic feet to precisely interact with and control software on your laptop or desktop computer.” — that’s what it was designed for, but I wonder what else you could make it do? Hmmm…

Sunday, May 20, 2012

Make your own Conductive Ink

Make your own Conductive Ink:

Jordan Bunker writes:
Conductive inks have a myriad of different interesting applications. As a quick, additive construction method for electronic circuits, they are especially intriguing. Unfortunately, for a long time they have been just out of reach of the hobby market. They are too expensive to buy in decent quantities, too complicated to make, too resistive to be practical, or require high annealing temperatures (which would ruin many of the materials you’d want to put traces on).
Now, though, thanks to some brilliant minds at the UIUC Materials Research Laboratory, you can make your own decent conductive ink!
Make your own Conductive Ink - [Link]

Saturday, May 19, 2012

DIY Virtual Reality for Skyrim using Kinect

DIY Virtual Reality for Skyrim using Kinect:
If you’re a fan of Skyrim and you want to immerse yourself deeper into the game, this is the project for you.  Learn how to build your own virtual reality setup which captures head and body movement and map them to your character in the game.

Some of the equipment you will need is a Sony HMS-T1 head-mounted display, a Trackr5 for tracking head movement, a speech recognition set up, and a Kinect for tracking body movements.   Overall, it’s a pretty complex system which integrates a multitude of hardware and software systems.  See the full details of the project to build your own.

Similar Virtual Gaming Simulator:


EEVblog #279 – How NOT To Blow Up Your Oscilloscope!

EEVblog #279 – How NOT To Blow Up Your Oscilloscope!:


And how NOT to blow up your Arduino.

Your oscilloscope ground clip lead can be a potential accident waiting to happen.

Why? And how do you avoid it?

The basics about measuring mains earth referenced equipment with your oscilloscope.

DIY electomagnetic interference detector

DIY electomagnetic interference detector:


Popular Mechanics presents this simple DIY electromagnetic interference (EMI) detector project. It’s Arduino based and requires only an 8-ohm speaker, 1-megaohm resistor and 3–5 feet of insulated solid core wire.
Details on this easy beginner’s project can be found on the Popular Mechanics website, with links to the Arduino sketch on the author’s Github page.

DIY Radio Control

DIY Radio Control:
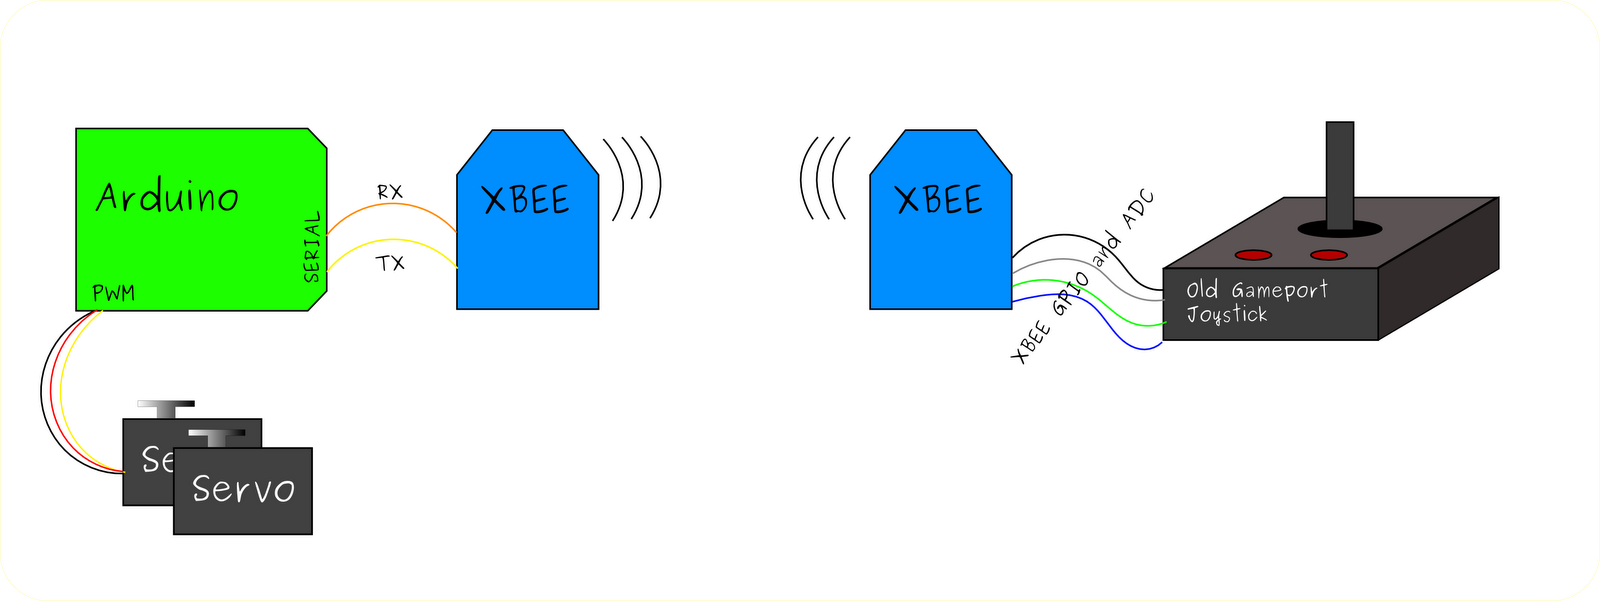
Going to buy a new Wireless Controller for your next Robotics project. Why buy a new one when you can Do-It-Yourself? All you need is an Arduino, an old Joystick with a Gameport (15-pin connector) and a pair of Series 1 xBee Modules.
The explanation of the xBee Configuration and the xBee Packet Description is very well done at the blog.
Block Diagram
Transmitter: Joystick + xBee [No additional hardware needed]
Receiver: xBee + Arduino + [your amazing Robot, Car or a Plane!]
Schematic

DIY Amp Hour Meter

DIY Amp Hour Meter:
Ever wanted to see how much electricity your next project is consuming? Look no further; this Instructable will guide you about how you can, too, make a device to monitor the same.

This project was developed by Steve Spence of Arduinotronics with input from forum members at the Yahoo Group - Arduino Home and The Arduino Forum.
Steve writes:
“There’s a couple of commercial products that can do this, but not with the flexibility I wanted. I designed an Arduino micro-controller based solution that is very extensible. Right now it monitors the above values of attached gear, and I’m thinking about adding web monitoring and an SD Card for data collection.”

The Oatmeal’s Tribute to Nikola Tesla

The Oatmeal’s Tribute to Nikola Tesla:

Online comic strip, The Oatmeal, has done a fantastic job with their long tribute to Nikola Tesla.
Geeks stay up all night disassembling the world so that they can put it back together with new features.
They tinker and fix things that aren’t broken.
Geeks abandon the world around them because they’re busy soldering together a new one.
They obsess and, in many cases, they suffer.
Over one hundred years ago, a Serbian-American inventor by the name of Nikola Tesla started fixing things that weren’t broken.
What a great intro to a well written overview of Tesla’s accomplishments.  Take some time today, and read through the whole thing.

Bananaphone: A Touch Capacitance Synth

Bananaphone: A Touch Capacitance Synth:

Aw hell yeah, Bananaphone!
I was recently inspired by a Kickstart project which used Bananas as sensors to control a video game on a PC.  I’ve done some video game controls using the Propeller in the past, but I thought this would make an interesting synthesizer project.
Window-154
Parallax Propeller Quickstart USB Development Board. The QuickStart is an evaluation board for the 8-Core Parallax Propeller. As an open-source reference design the QuickStart board provides basic Propeller circuitry. Developers may use our PCB layout files as their own to speed their project towards completion. As a project board the QuickStart is fully expandable and provides unimpeded access to all I/O pins through an expansion header but includes some button inputs and LEDs to demonstrate programming. With USB power and a selection of QuickStart Project examples it’s also the fastest way to get up and running.
Examples at Parallax Semiconductor:
Features:
  • Open hardware reference design through our Altium and DipTrace PCB layout files (more export options may be possible)
  • Bus-powered USB coupled with 3.3V regulator for 500 mA
  • 5 mHz cyrstal on board may be disabled by removing SMT jumper, allowing replacement with external through-hole crystal
  • 64KB EEPROM (32K for P8X32A program, 32K for general-purpose use)
  • External brownout reset may be installed by removing SMT jumper
  • (8) blue LEDs on P16-P23
  • (8) resistive touch-buttons on P0-P7
  • Pads for sigma-delta A/D circuitry (two resistors and two capacitors, both 0603) for using the Sigma-Delta A/D AppNote
  • Expansion header provides access to Vss, Vdd, 32 I/O pins (28 for any use, 2 are I2C bus, and two are optional Tx/Rx if connected to USB power)
  • Measures 2″ x 3″ (5.1 cm x 7.6 cm)
This board doesn’t come with a mini-B USB cable or bumpers, but we stock them in the shop so you may want to pick those up.
In stock and Propelling now!

EE Bookshelf: Measuring Ground Noise

EE Bookshelf: Measuring Ground Noise:

While trying to reduce the overall noise level on some boards I’ve been working with, I was looking for a reliable way to first measure the noise level and figure out how best to address the problem.  If you can’t measure or visualize it, it’s hard to fully understand it and reliably fix it!   Looking for a solution to measure the quality of the GND planes, etc., I came across this helpful appnote from Analog Devices: Measuring Ground Noise.  They present a relatively straight-forward setup based on an AD620 instrumentation amplifier that can be used to characterize the GND plane on your boards.  The article is worth reading simply because it brings up something a lot of people don’t think about doing boards design: GND.  Particularly with high-speed design (anything greater than a few MHz), or with switching-mode power supplies, etc.,  it’s important to think about the return paths on your boards in addition to the signal transmission lines and part placement.  Howard Johnson’s High Speed Digital Design is probably the best book (that I know of!) on the subject, but I haven’t seen very many circuits showing how you can measure noise on the gnd plane, so I thought it was worth sharing the above PDF.