Thursday, October 4, 2012

Another great backyard observatory build

Another great backyard observatory build:

With a little help from their friends [Jeff Fisher] and his dad built this observatory in their back yard. Their use of simple building materials and techniques show that you can create a respectable home observatory without breaking the bank.
It starts with a footing for the telescope mount. This is completely separated from the building that surrounds it so there will be no issue with vibrations affecting the images it is capturing. From there a foundation made of cinder blocks was laid before placing joists and installing a sub floor. It was during this process that they trenched and placed conduit to run power to the building. With the floor in place the walls were stick built and a carefully crafted dome was assembled and hefted in place by this septet of gentlemen.
Four months was all it took to get to this point, but [Jeff] and his dad are still working on a deck to go around the observatory. They’re using a very nice telescope that they purchased, but it is also possible to build one of those yourself.
[via Reddit]

Filed under: home hacks

Sunday, September 9, 2012

ProtoSynth, the prototyping synthesizer

ProtoSynth, the prototyping synthesizer:

This project isn’t really a prototype, but a tool for prototyping. [Tymkrs] came up with a unique way to build this synthesizer prototyping tool. They actually patched into the underside of the breadboards in order to keep all of the permanent bits nice and tidy.
In the clip after the break you’ll see all of the build photos that lead up to this point. After cutting out and assembling the wooden pieces for the case they grab a soldering iron and get to work. Two octaves worth of keys were pulled out of an electric keyboard. Ribbon cable is soldered onto each key’s electrical connection, with an SIL pin header as a connector. This mates with another ribbon cable with a SIL socket on one end, and an IDC connector on the other. The real trick is getting that IDC connected to the breadboard. They cut back the adhesive tape on the underside of the board and soldered a surface mount pin header onto it. This way the inputs from the keys, as well as a few 1/4″ jacks from the back of the case are always available in a tidy way on the breadboards. The video goes on to show preliminary synthesizer work on the device.


Filed under: musical hacks

Electronic beer pong removes beer from the equation

Electronic beer pong removes beer from the equation:

You can take the guy out of the frat house, but you can’t take the frat house out of the guy. [Evan Flint] proves this with his incessant need to have a beer pong game at all of his parties. But now that he’s growing up, and living in nicer places, he doesn’t necessarily want to have the oft-messy game in his home. So he found an electronic solution to his problem. Electropong is like an electronic dart board for playing beer pong. You won’t find beer in the cups, but you’ll still find plenty of fun.
The game includes the triangle of cups that makes up a traditional playing area. In the bottom of each cup is an RGB LED that will keep track of each player’s hits by lighting the cup in that team’s color. Illuminated buttons provide a way to control the game, with an LED marquee to read out the score.
[Evan] mentions some difficulty in recreating the physics of a cup full of beer. He says he overcame the challenge, but alas, there are no details on how. We’ve asked him to update his post so check back for more info.

Filed under: beer hacks

Cheetah robot can run down even the fastest of us

Cheetah robot can run down even the fastest of us:

It’s a blur, but you really don’t want to seen this thing coming for you anyway. It’s the latest look at what the folks at Boston Dynamics have been working on under a DARPA contract. They call it the Cheetah robot as it’s the fastest four-legged bot ever developed. The clip after the break shows it breaking the world record over 100 meters… for a human. This isn’t really legitimate since the run is done on a treadmill and the robot is tethered. But it’s still impressive scary.
The Cheetah is a relative of BigDog, another Boston Dynamics robot which we’ve seen several times in the past. BigDog specializes in lifting heavy loads and traversing rough terrain. We don’t think it will be too long before both traits can be “bred” into one device. A lot of times when we feature these robots there are comments about how they invoke images from The Terminator movies. For us this is more along [Michael Bay's] vision of robots from the Transformers series. It certainly not small enough or fast enough to be seen as an early version of the Rat Thing.


[Thanks Ferdinand via EnDanDit]

Filed under: robots hacks

Building a watch for Curiosity’s drivers

Building a watch for Curiosity’s drivers:

Eight long years ago, when the Martian rovers Spirit and Opportunity were steaming towards our dusty neighbor, JPL systems engineers [Julie Townsend] and [Scott Doudrick] were stuck trying to solve a very strange problem. After the twin rovers landed, the rover drivers would have to live on Mars time. Because a Martian day lasts 24 hours, 39 minutes, rover team members would have to report to work 39 minutes later than the previous day. After much cajoling, a watchmaker by the name of [Garo Anserlian] was convinced to create a mechanical watch that lost 39 minutes per day, giving the team responsible for driving Spirit and Opportunity across the Martian desert these last eight years a temporal connection to the task at hand.
Of course, a lot happens in eight years. Now we have incredibly inexpensive, fully programmable TI Chronos watch, used by [Arko] to make a wristwatch set to Martian solar time. Instead of a master watchmaker selling the slowest wristwatch ever for hundreds of dollars, staying on Curiosity time is a simple matter of reprogramming a $50 wrist-mounted computer.
The build began by taking the default firmware for the Texas Instruments EZ430 Chronos wristwatch. In its stock configuration, the Chronos takes a 32.768khz clock signal, counts out clock pulses, and increments the number of seconds every time a counter reaches 32,768.
Because a Martian Sol is 24 hours, 39 minutes and 35 seconds of Earth time, [Arko] needed to program the seconds display to change every 1.027 Earth seconds. This meant changing the seconds every 33,668.833 clock cycles, instead of the Earth-oriented 32,768 clock cycles.
There’s one small glitch with that plan: the timer in the Chronos wristwatch can’t deal with floating point numbers, meaning [Arko] had to settle for incrementing the number of seconds ever 33,668 or 33,669 clock cycles. After a bit of math, [Arko] found using a value of 33,669 would mean his Martian time watch would only lose about 2 seconds a day, a minute after 78 Martian Sols, or 8.57 Martian minutes after one Martian year.
The build only took [Arko] five hours in front of his computer, and he doesn’t consider this to be a finished product. He plans on adding a few bells and whistles such as being able to display both Earth and Mars time. Still, an awesome build if your job description includes driving a rover across the Martian plains.

Filed under: clock hacks


Eventorbot 3D Printer

Eventorbot 3D Printer:

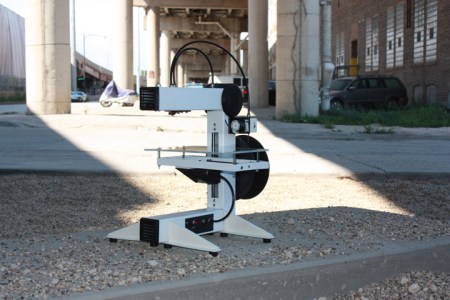
Tired of 3D printers that use t-slot construction? The Eventorbot is yet another open source 3D printer,  but it’s built out of steel and 3D printable parts. The design also aims to minimize the effect of vibrations by using a single solid frame. All of the wiring runs through the steel frame, which gives the printer a professional look.
The Eventorbot page on the RepRap wiki provides details on how to build your own, along with STL files for all the printable parts. If you want to see renders of the parts, they’re all available on Thingiverse. The material cost is $300-$500, and the assembled cost is quoted at $799.
Like many of the open source printers we’ve seen, this one uses the RepRap Mega Pololu Shield (RAMPS) to control the actuators. This is attached to a Sanguinololu motherboard, which runs the RepRap firmware.
The Eventorbot Youtube channel has a collection of videos detailing the assembly of the robot. Check out a video of a test print after the break.
Via Make


Filed under: cnc hacks


Monday, September 3, 2012

App note: Switch mode regulators for battery powered systems

App note: Switch mode regulators for battery powered systems:

Maxim describes various SMPS regulator topologies for battery powered systems. Isolated and non-isolated topologies are covered:
This tutorial presents an overview of regulator topologies for battery-powered equipment. The discussion covers linear regulators, charge pumps, buck and boost regulators, inverters, and flyback designs. The importance of peak current is explained, and schematics of each topology are shown.

Moog Etherwave Standard Theremin Kit

Moog Etherwave Standard Theremin Kit:
29492805587

Moog Etherwave Standard Theremin Kit.

Mathigon | The Mathematics Education Project

Mathigon | The Mathematics Education Project:
Adafruit 415
Mathigon | The Mathematics Education Project.
The mathematics curriculum in schools often focuses on topics like arithmetic or algebra – they are important, but can be very dry and boring. And they are the reason why so many people ‘hate’ maths.
But mathematics is much more than counting and solving equations, and everybody should know ideas like Prime Numbers, Graph Theory or Differential Equations. Because they are exciting and beautiful, because they are of fundamental importance in our world, and because they are part of our culture – as much as Mozart and Shakespeare.
Mathigon is a website with educational resources for children, teachers as well as the general public – ranging from videos and animations to classroom activities or interactive eBooks for PC and iPad. Mathigon tries to redefine what mathematics education should look like in a digital age, and uses the latest technologies to explain advanced mathematics in a fun, entertaining and engaging way.

Etching your own PCBs at home

Etching your own PCBs at home:

Etching your own PCBs from copper clad board is nothing new, but the ability to make your own circuit boards at home is so useful it should be part of every maker’s repertoire of skills. The folks over at Hub City Labs in Moncton, NB, Canada put together a workshop covering the basics of home PCB manufacturing, allowing any maker to put a circuit board in their hands in under an hour.
The process starts just like any PCB design – laying out traces, parts, and vias in a PCB designer such as Eagle. When making your own boards, it’s a good idea to make the traces and pads extra large; the folks at Hub City Labs follow the 50-50 rule: 50 mil wide traces with 50 mils of seperation.
The PCB design is printed out with a laser printer (in mirror mode) onto a piece of paper from a glossy magazine or inkjet photo paper. After the copper board is scrubbed to remove any oxidation or oils present, the design is laid face down on the copper and heated with a clothes iron or sent through a laminator.
After the laser printer toner is transferred to the copper, the recipe calls for etching the board with a solution consisting of a half cup of 3% Hydrogen Peroxide and a quarter cup of muriatic acid.
The folks at Hub City Labs put together a great tutorial for one of the most useful skills the home electronics wizard can have, but etching your own PCBs is an art unto itself. There’s a lot of ways this process can be improved, from using Kapton tape to secure the printed art to the copper board, to getting high-strength peroxide from a beauty supply store.
If you’ve got any tips on making your own PCBs at home, drop a line in the comments below.
EDIT: Good job killing Hub City Lab’s web server, everybody. They’re working on getting something up.

Filed under: tool hacks


Building a driver for absurdly high power LEDs

Building a driver for absurdly high power LEDs:

A few years ago, the highest power LEDs you could buy capped out around three watts. Now, LED manufacturers are taking things to ridiculous power ratings with 30, 40, and even 90 watt LEDs. Getting these high-power LEDs are no longer a problem, but powering them certainly is. [Thomas] built a LED driver capable of powering these gigantic LEDs and creating a light show that is probably bright enough to cause bit of eye damage.
[Thomas]‘ LED driver is based on Linear Technology’s LT3518 LED driver. This driver is part of a project to build a huge WiFi controlled RGB LED, so the driver has outputs for three separate LEDs capable of sourcing 700 mA each.
Because [Thomas] is dealing with crazy amounts of heat and power required to light up these huge LEDs, the driver board features a temperature sensor next to each LED driver. When the board gets too hot, the driver automatically shuts down, preventing bad things from happening.
You can check out a few pictures of [Thomas]‘ LED driver over on the build page for his WiFi LED project. A truly awesome amount of lighting power here, that also makes it impossible to get a good picture of the board in operation.

Filed under: led hacks

Can a Kickstarter project actually build a space elevator?

Can a Kickstarter project actually build a space elevator?:

It’s the stuff that Science Fiction is made of: an elevator that climbs its way into space rather than needing a rocket to get there. Can it be done? No. But this Kickstarter project aims to fund research that will eventually make a space elevator possible. They’re already way over their goal, and plan to use the extra funds to extend the reach of the experiments.
A complete success would be a tether that reaches into space, held taught by a weight which is pulled away from earth by centrifugal force. That’s not really on the radar yet (last we heard humans weren’t capable of producing a substance strong enough to keep the tether from snapping). What is in the works is a weather balloon supporting a ribbon which a robot can climb. The team isn’t new to this, having built and tested several models at University and then in a start-up company that closed its doors a few years ago. Now they’re hoping to get a 3-5 kilometer ribbon in the air and to build a new robot to climb it.
For now we’ll have to be satisfied with the 1000 ft. climb video after the break. But we hope to see an Earth-Moon freight system like the one shown in the diagram above before the end of our lifetimes.


[Thanks uMinded]

Filed under: robots hacks


Arduino Tachometer tutorial

Arduino Tachometer tutorial:

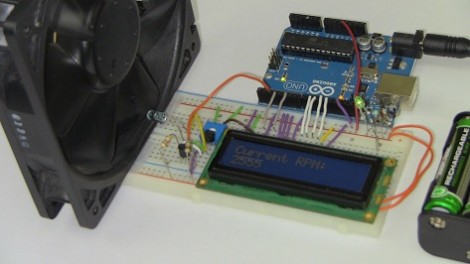
This tutorial will guide you through the process of building a tachometer around an Arduino. Tachometers are used to measure rotation rate in Revolutions Per Minute (RPM). You don’t need much in the way of hardware, this version uses an Infrared beam to measure fan speed. As with last year’s PIC-based tutorial, [Chris] is using a character LCD to output the reading. Wiring and driving the LCD ends up being the hardest part.
An IR transmitter/receiver pair are positioned on either side of the fan. When the blade passes in between then, the receiver shuts off a transistor connected to one of the Arduino’s external interrupt pins. He shows how to use this interrupt to measure the amount of time between the passing of each fan blade. If you divide for the number of blades, and average the reading for greater accuracy, you can easily calculate RPM.
Another alternative would have been to use a reflectance sensor which allows to for the transmitter and receiver to both be on the same side of the fan.

Filed under: arduino hacks