Understanding op-amps from simple to hard:
[Tim K.] wanted to help out a ECE student struggling with some Op-Amp problems. He put together a video which does a good job of explaining what an Op-Amp does, then tackles each of the questions one at a time.
His analogy is illustrated in this image. There’s an operator using a crane to lift a crate. He is watching a ‘radio man’ in a window of the building to know how high it should be lifted. These roles are translated to the function of an Op-Amp in a way that makes understanding the common parts quite easy. The crane is the Op-Amp and the floor to which it is trying to lift the crate is the input pin. The current height of the crate is the output signal. The radio man is the feedback resistor which is trying to get the desired height and current height to equal each other. Watch the video after the break and all becomes clear.
After this analogy is explained [Tim] tackles the actual homework problems. He’s going through everything pretty quickly, and doesn’t actually give the answers. What he does is show how this — like most circuit solving problems — depends on how you group the components in order to simplify the questions. Grab a pen and paper and put on your electron theory hats to see if you can solve the questions for yourselves.
In this video from the recent Notacon 9 conference, EFF activists Trevor Timm and Parker Higgins present on the widespread and increasing use of drones by government. Aspects of recent drone hacks are highlighted, security flaws noted, as well as the growing popularity of DIY civilian drones.
For more information on the use of drones in the United States, including a map of US government domestic drone bases, check out this WIRED article by Lorenzo Franceschi-Bicchierai.
To learn more about the efforts of the EFF in monitoring government drone activity in the US, as well as to access a list of agencies which have received FAA approval to operate domestic drones, visit Parker and Trevor’s EFF drone page.
Many times electronic system failures are blamed on the parts when the real cause was human error. Of these human errors, the most common is poor understanding of analog in a digital world. All too often brilliant digital designers have never been taught analog techniques because engineering schools are reducing the amount of analog taught. Maxim, however, is an analog mixed-signal Company. In this application note we share some analog concepts that will help overcome common “human” error and improve analog circuits around the system.
EE Bookshelf: I2C Bus Technical Overview:
Since we’ve been busy adding quite a few I2C sensors and breakouts lately, I thought this technical overview of the 2-wire “Inter-Integrated Circuit” bus might be handy. I2C isn’t fast (typically limited to 400kHz in most real-world situations), but it’s convenient since it only requires two pins and more than 120 devices can be connected on the same bus, address space permitting. For low-pin count devices, it can be a real life-saver since you can hook an OLED display, a DAC, a 7-segment display and 16 servo motors up to your Arduino with a measley two pins and some careful coding! The full bus specification is available from NXP in UM10204 – the bus was created by Philips, whose semiconductor branch later became NXP — but the more concise information from Embedded Systems Academy might be easier to digest as a starting point. The FAQ has some very good information in it.
This platform overview video shows quadrotors in flight, fixed wing hardware in the loop simulation and a novel experimental aircraft. It also introduces all PX4 hardware modules (available from 3D Robotics).
Update: For some reason the video is now marked private
I’m pleased to announce the new APM 2.0 revision, better known as APM2.5! But before you start screaming that you just got an APM 2.0, let me explain that there’s NO difference in performance at all between the two, the board is still the same in terms of functionally and it runs exactly the same code as APM 2.0. We just took the liberty of throwing in a few new universal connectors in there (so accessories can be cross compatible with the new PX4 and protect the user from connecting the cable in the wrong direction), some production improvements that will allows to manufacture it faster and finally we added some protection features to protect it from those reverse polarity/short circuit lovers.
We’re making them at the new Tijuana facility, so we hope that we’ll be able to keep up with demand much better than we have in the past. We’re committed to shrinking all delays, and our investment in the Tijuana facility is just one sign of this.
Two hard disks and one DJ get down with no delay:
Mixmaster [robelix] built a MIDI controller for DJs that uses two hard drives for scratching and cutting some wicked beats.
[robelix]‘s project is called Hard DJ and was inspired by this earlier build capable of producing a droning appreciated chiptune music using the motor inside a hard drive. Instead of reading the out of phase sine waves produced when a hard drive platter is manually rotated, [robelix] used custom laser cut encoder wheels and an IR detector from old computer mice. This gives [robelix] far more resolution than would be possible by reading the drives stepper motors and allows him to scratch and cut to whatever his MC desires.
The electronics portion of the build are a little rough at this stage – just an Arduino Mega, a few buttons, and a trio of faders. [robelix] will be building a proper enclosure for his controller soon, something we can’t wait to see.
If you’d like to clone this DJ controller, all the files are up on the Git. Check out the video after the break.
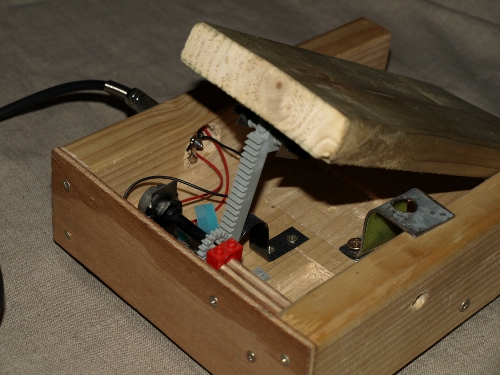
Guitar effects pedal with Pure data and Arduino:
Pierre Massat is sharing his experience in building a guitar multi-effect on his blog. The project is based on a pedal built hooked up to an Arduino Uno and a PC running Pure Data.
Click here to vote! As you can see in our submission video above, we built a giant submarine simulation game. The challenge was pretty intense, and we didn’t actually come to an agreement on an idea until we were already 24 hours in. So, we managed to create what you see in the video in roughly 48 hours. We had an absolutely perfect crew for the job.
The structure of the submarine was drawn up in Sketchup, and cut out on a Shopbot CNC machine. We then salvaged nearly everything you see on the submarine, from the LCD display, to the pipes, and the metal grating on the floor. The whole submarine rocks back and forth with an old hospital bed actuator. We even have a built in vibration motor that shakes the submarine when you get hit by a torpedo.
On the electronics side, we have the whole thing powered by three Arduinos. We chose to use three Arduinos instead of something like an Arduino Mega, because we have each Arduino running a specific task on their own, and then communicate with each other to trigger events. One of the events is if enough people tweet #firetorpedo while the game is in play, red lights start flashing and warning sounds go off letting you know a torpedo has been launched (you can even see the torpedo incoming on the LCD radar screen). You get a voice command telling you what you need to do to evade (press buttons in a certain order, pull handles, or crank valves). If you are too slow, you will get hit, the whole sub will rock, and a bunch of valves will break. You will then have to close them manually. We use an Arduino Ethernet to communicate with Twitter, and an Adafruit Wave Shield to take care of the sound effects.
The story behind the game is that you were just hit by depth charges, and you need to evade the enemy while repairing your submarine. You have two minutes to repair the submarine and launch a torpedo to destroy the enemy. If you are fast, you can get out of the game completely dry. If you are slow, you will certainly get wet!
We had a ton of fun building the submarine, and I am personally blown away by what we were able to accomplish in such a short amount of time. If you agree, please vote for team 1.21 Jigawatts by clicking here. If we get enough votes, we will be taking the submarine game to Maker Faire New York where you will be able to play it in person.
Note: Red Bull is using Facebook integration to manage the votes, so you will need a Facebook account to vote. Update: It looks like the Red Bull webpage is making it as hard as possible to vote. You will need to disable your popup blocker and click on the vote button, then click accept to the Facebook app. Then, finally, click the vote button again to register your vote. Also, a special thanks to the Adafruit team for getting us all of our electronics gear by 10am the following morning! We couldn’t have finished without your help.
Building a controller for MMOs:
It’s a simple fact of gaming that controllers are more suited for shooters, while the WASD + mouse control of the PC gaming master race is more suited for real-time strategy games and MMOs. [Gabriel] wanted to challenge this idea, so he put together a controller combining the best of a mouse and keyboard for some hand-held RTS and MMO action.
The Keyball Controller as [Gabe] calls it is an amazing amalgamation of a 3rd party XBox and PS3 controllers, an SNES controller, a trackball, two USB keyboards and a ton of Bondo. The front of the Keyball features a WASD D-pad, scroll wheel, trackball, tiny keyboard and a few other commonly used buttons. The rear of the controller is loaded down with tons of trigger buttons and a few meta buttons that alter the function of other buttons.
The fabrication of the controller is absolutely phenomenal and certainly something that deserves to be copied. We’ve seen some controllers duplicated with a silicone mold and resin, so we can only hope that [Gabe] is looking at RTV silicone at the moment.
Spinning-hell of a game:
North Street Labs really brought their ‘A’ game to the build finals for the Red Bull Creation contest. Behold the Centrifury, their spinning hell of a game. You can’t really make it out (because of the spinning) but the game consists of two bucket seats positioned opposite of each other on a merry-go-round type deck. Each player has a button in front of them which must be held down for the rig to start spinning. When you can’t take it any more just release the button and the spinning will stop. But you’ll also have lost the game. Whomever can hold out longer wins.
It’s not surprising to see such a well-polished build. After all, this is the same group that built the violently vibrating game of Simon. This time around most of the work came in the form of engineering and welding. First they had to make sure the design could take the forces this things puts out, then they had to build it. And all within the 72-hour time limit. We’re not sure what’s harder, winning the game or trying not to smile while watching the video after the break.
Reading Sega carts off a breadboard: Golden Axe is great, and the Sonic 3/Sonic and Knuckles combo is one of the highest works of art from the 16-bit era, but for those of us without a working Genesis or Megadrive, we’ve had to make due with the ROMs others provide. [Lee] figured out an easy way to read the data off these old Sega cartridges using easily scavenged parts and an Arduino Mega, paving the way for an Arduino-based ROM dumper.
The connector on the bottom of a Sega Genesis cartridge has a 2×32 pinout, normally requiring 64 connections to actually read the card. These connectors aren’t readily available, but [Lee] did manage to find a few 2×31 pin connectors lying around in the form of old ISA sockets. The outer pins of a Genesis cart are used for grounds and a ‘cartridge insert’ slot, and after filing away the end of an old ISA connector, [Lee] found he could actually read the data on these old game cartridges.
There are 49 data and address pins on these old Sega carts, so an Arduino Mega needed to be brought into the mix to actually read some of the data on the ROM chip. As of now, [Lee] can read data from the cart but has only gotten so far as to read the licensing data stored at 0×80. Still, very cool and the first step towards an Arduinofied Sega cart dumper.
Bridge circuits are among the most elemental and powerful electrical tools. They are found in measurement, switching, oscillator and transducer circuits. Additionally, bridge
techniques are broadband, serving from DC to bandwidths well into the GHz range. The electrical analog of the mechanical beam balance, they are also the progenitor of all electrical differential techniques.
How can an interface change a happy face to a sad face? Engineers have happy faces when an interface works properly. Sad faces indicate failure somewhere. Because interfaces between microprocessors and ICs are simple—even easy—they are often ignored until interface failure causes sad faces all around. In this article, we discuss a common SPI error that can be almost impossible to find in a large system. Links to interface tutorial information are provided for complete information. Noise as a system issue and ICs to minimize its effects are also described.
I recently came across this neat web app that let’s you draw an equation and have it automatically converted to LaTeX or MathML. You can also submit the eq. to Wolfram Alpha for evaluation. This is actually a demo page for MyScript handwriting recognition software, and it recognizes all the standard LaTeX symbols, including Greek letters and set operators. Super handy if you want to draft up a quick LaTeX expression and can’t remember the special character codes.
This project combines the collective talents of musicians, dancers, programmers, designers and animators to create an amazing visual instrument. Creating music through motion is at the heart of this creation and uses the power of the Kinect to capture movement and translate it into music which is performed live and projected on a huge wall.
v.co.nz/#the-motion-project
We created and designed the live visual spectacle with a music video being produced from the results. We wanted it to be clear that the technology was real and actually being played live. The interface plays a key role in illustrating the idea of the instrument and we designed it to highlight the audio being controlled by the dancer. Design elements like real time tracking and samples being drawn on as they are played all add to authenticity of the performance. The visuals are all created live and the music video is essentially a real document of the night.
Taylor Wilson has big dreams: to build nuclear fusion reactors that will solve the world’s energy crisis. “I’ve got some technology that will really change the world, so college right now is not the best option for me,” said Mr. Wilson, who is just 18 but built his first working reactor at 14. He plans to start a company, aided by a $100,000 grant as the recipient of a “20 Under 20” Thiel Fellowship. Before tackling a new form of energy, he will address slightly more modest tasks: detecting nuclear weapons and diagnosing cancer with his technology.
Every frame in this video is a photograph taken from the International Space Station. All credit goes to the crews on board the ISS. Removed noise and edited some shots in photoshop. Compiled and arranged in Sony Vegas.
Music by John Murphy – Sunshine (Adagio In D Minor)
Last December, MIT announced the creation ofMITx, an ambitious project to recreate the MIT classroom experience online; in March, the MITxprototype course — “Circuits and Electronics,” or 6.002x in MIT’s course-numbering system — debuted. In May, MIT and Harvard University jointly announced the creation of edX, an organization that will further develop the MITx platform and enable other universities to use it as well.
As MIT and Harvard gear up to offer new edX courses in the fall, the edX team is taking stock of its experience with 6.002x and beginning to incorporate what it learned into the system’s design.
In the end, almost 155,000 people registered for 6.002x. Of those, roughly 23,000 tried the first problem set, 9,000 passed the midterm, and 7,157 passed the course as a whole.
While the rate of attrition may seem high, Anant Agarwal, the president of edX and a professor of computer science and engineering at MIT, points out, “if you look at the number in absolute terms, it’s as many students as might take the course in 40 years at MIT.”
In this video Massimo explains the Arduino Leonardo, talking about its differences with Arduino UNO and playing around with its mouse & keyboard features.
Arduino Leonardo ATmega32u4 with headers. The latest addition to the Arduino family is here! The Arduino Leonardo is a microcontroller board based on the exciting USB-enabled ATmega32u4 (datasheet). This chip has about the same amount of flash, RAM and capability as the ATmega328 found in the UNO. It has 20 digital input/output pins (of which 7 can be used as PWM outputs and 12 as analog inputs), a 16 MHz crystal oscillator, a micro USB connection, a power jack, an ICSP header, and a reset button. It contains everything needed to support the microcontroller; simply connect it to a computer with a USB cable or power it with a AC-to-DC adapter or battery to get started.
The Leonardo differs from all preceding boards in that the ATmega32u4 has built-in USB communication, eliminating the need for a secondary chip (such as an FTDI friend, FTDI cable or the USB/Serial converter on the UNO). On one hand this means that sketches on the Leo are a little bigger because it’s also handling USB interaction. On the other hand, it allows the Leonardo to appear to a connected computer as a mouse and/or keyboard, in addition to a virtual (CDC) serial / COM port. It also has other implications for the behavior of the board; these are detailed on the getting started page.
We’re very excited to have a small shipment of Leo’s in stock. Please note that this board is very new and so is best used by people with existing Arduino experience as there may be a bug that trips up beginners. It is probably not going to work with all every shield yet. We haven’t gone through and tested it with all the Adafruit shields and don’t guarantee it will work until we’ve sat down and done a lot of testing and coding, so keep that in mind!
This board is only supported in the latest Arduino IDE 1.0.1 so you will also need to update the IDE. In stock and shipping also check out the version WITHOUT headers too!
This morning we announced that we have just led a $3m investment in Modular Robotics. I’ve joined the board and am psyched to now be an investor in two Boulder-based robotics companies – ModRobotics and Orbotix. In the spirit of “show” vs. “tell” (which everyone in TechStars has driven into their brains over and over again) here’s a short three minute video that shows how ModRobotics first product – Cubelets – works.
This morning we announced that we have just led a $3m investment in Modular Robotics. I’ve joined the board and am psyched to now be an investor in two Boulder-based robotics companies – ModRobotics and Orbotix. In the spirit of “show” vs. “tell” (which everyone in TechStars has driven into their brains over and over again) here’s a short three minute video that shows how ModRobotics first product – Cubelets – works.
Retrotechtacular: The miracle of vacuum tubes:
We take our digital life for granted these days, but back in 1943 it was vacuum tubes, not transistors, which made it all possible. This video on the types and industrial uses of vacuum tubes was sent into the tips line by [Polar Bear]. The nearly 70-year-old video is part of a collection preserved by the New Jersey Amateur Radio Club.
The video was underwritten by Westinghouse, and as you can expect it has a bit of propaganda spin for the company. The time period in which the reel was produced is also telling. Coming about two years after the attack on Pearl Harbor, the applications for technology of the time are almost all military in focus. But we’re sure you’ll be entertained by both the film style and the tech explanation. It’s something of a How It’s Made of yesteryear. All twenty-one minutes of it are found embedded after the break.
Building an autonomous robot from an Xbox 360 controller:
Wow, it’s amazing what [Carl] was able to build using an Xbox 360 control PCB as the base for his robot. His forum posts just touches the surface of the build, but he linked to a PDF file which has the full details.
This build basically attaches sensors and replacement motors to the controller board… and that is it! Some distance sensors are connected to the analog inputs for the left and right trigger. The whiskers use a couple of leaf switches soldered to controller button pads. The motors are geared replacements that use the same connectors as the rumble motors did.
The idea is that the controller is connected to a PC via the wireless radio it has on the PCB. Once the connection is made the PC software can read from all of the sensors and drive the motors accordingly. It would also be really easy to use a single-board solution like the RPi to do away with the need for a remote PC. But this is a fantastic start, and an approach which we had never before considered. See some video of the little guy getting around the room after the break.
Simple tool to aid copper clad circuit building:
For ham radio enthusiasts the art of building free-formed circuits using little bits of copper clad board is second nature. But [AndyDaviesByTheSea] figured out how to build your own tool to make the process much easier.
First, here’s a quick rundown of the traditional build method. One base sheet of copper clad serves as the ground plane. Small squares of copper clad are cut and super glued to the base sheet to serve as the signal pads.
[Andy's] variation on this is to use a hollow drill bit to isolate small circles within the ground plane. You can see above that this gives him signal pads that he doesn’t need to glue on. He made his own tool to use in the drill press. It’s just a bit of tubing into which he cut several teeth using a hand file. Check out the step-by-step video after the break to see how it’s done.
Robot trash can catches anything you throw near it:
This guy is about to toss the blue ball half way between the book shelf and the waste basket. By the time it gets there the waste basket will have moved into position to catch the ball perfectly. It’ll do the same for just about anything you throw.
We’re unable to read the captions but it looks like this may have been made as part of a commercial which is shown in the first few seconds of the video after the break. From there we see the development of a locomotive mechanism which will fit into the bottom of the bin. It start as a single swivel wheel, but gets more complicated quite quickly. Once the low-profile three-wheeler is milled and assembled it’s time to start writing the code to translate input from a Kinect 3D camera and extrapolate the position for catching the trash. The final result seems to do this perfectly.