Tuesday, May 29, 2012

View Your PCB Design in 3D Online for Free

View Your PCB Design in 3D Online for Free:

Mayhew Labs writes:
Whether you’re a first-time circuit board designer or you’ve been doing it for years, you know how difficult it can be to visualize layout, spacing, and relative size in PCB layout software.  You might have also experienced that uneasy “I hope everything is right” feeling when you submit your design files for manufacturing.  You’re not alone!  I’ve ordered boards with silkscreen text way too small to read, components on the wrong side of the board, and even had my silkscreen and soldermask layers reversed by mistake!  Each of these times, the real problem was not having a good view of the design.
I came up with a solution to these problems and designed (with the help of a web developer) an online 3D Gerber viewer that anyone can use.  If you’re not familiar with Gerber files, they are the files that layout software (like Eagle, Altium, etc) export for manufacturing.  They describe everything pertinent about your board that will be required to actually create your PCB.
View Your PCB Design in 3D Online for Free - [Link]

Monday, May 28, 2012

Fasteners for 3D Printed Plastics

Fasteners for 3D Printed Plastics:

I Heart Robotics has done a bunch of testing of the strength of different fasteners in 3D printed plastics.  They found the strongest bond was a brass threaded insert that is installed with a custom soldering iron tip.
Since you also have to buy machine screws, they are a little expensive at $0.15 each, in quantities of 100. These brass inserts perform better than expected. The soldering iron tip makes them incredibly easy to install and the holding strength is more than sufficient for anything you would be 3D printing in plastic.
Looks very strong, and aesthetically pleasing at the same time.  Check out their previous tests here, here, and here.

Sunday, May 27, 2012

May 25: National Geek Day

May 25: National Geek Day:


It’s National Geek Day / Geek Pride Day! According to Wikipedia, “Geek Pride Day is an initiative to promote geek culture, celebrated on 25 May. The date was chosen as to commemorate the release of the first Star Wars film, A New Hope on 25 May 1977 (a/k/a Star Wars Day), but shares the same date as two other similar fan “holidays”: Towel Day, for fans of The Hitchhiker’s Guide to the Galaxy trilogy by Douglas Adams, and the Glorious 25 May for fans of Terry Pratchett’s Discworld.
The initiative originated in Spain in 2006 as “Orgullo Friki” and spread around the world via the internet.”
What geekiness are you celebrating today?
Via Wired.

Learn How to Use RC Car Components With an Arduino

Learn How to Use RC Car Components With an Arduino:

Ever wondered how to take your fancy RC car setup and interface it with an Arduino?  Check out this great blog by Duane Banks about all aspects of connecting RC car receivers, servos and more to an Arduino.  From here you could do neat things like turn the RC car into autonomous mode when you go out of range and navigate back with a GPS module.
Its a very common question, ‘How do I read and RC Receiver with my micro controller‘ and the answer is often very simple however the simple answer is close to useless in a real world application.
The approach outlined in this series of posts has been tested in an RC Race car running at 40+ Kmh at a range of 100 meters.
The approach is reliable, resilient, easy to understand and easy to modify. It has been tested using using 27Mhz AM radio equipment and entry level electronics. Use of better quality electronics and radio equipment will provide improvements in range and signal quality however as the development process has demonstrated, even low end equipment can be interfaced with Arduino for control of an RC Race car.

Friday, May 25, 2012

Arduino, GPS and Display i2C…

Arduino, GPS and Display i2C…:


En este nuevo tutorial Arduino by ARDUTEKA, estudiamos a fondo los módulos GPS, en concreto los módulos diseñados por LIBELIUM, para aprender a extraer y comprender todas las tramadas de datos que recibimos de los GPS y posteriormente, tratar esa información para mostrar en un display con bus i2C datos como la latitud, longitud, altura y hora UTC…


[Via: Arduteka]

Robotic Omni-Finger

Robotic Omni-Finger:

While the prototype in this vid just has one Omni-Finger, the final concept will include three of them (as in the illustration below). This will enable robots to arbitrarily alter the orientation of objects that they’ve grasped without having to set the object down, manipulate it, and re-grasp it, making grasping tasks as a whole easier andmuch more efficient. The only problem remaining is to figure out how to keep the fingers in contact with an irregular object as the fingers move it around, but the researchers are working on some creative ideas involving surrounding the fingers with deformable sacks filled with some sort of viscous fluid.

Arduino IDE 1.0.1 – New Features

Arduino IDE 1.0.1 – New Features:
The Arduino development team’s release of the new Arduino 1.0.1 IDE includes the big ticket items of Arduino Leonardo board support and translation into 32 languages.  However, a number of other features and bug fixes are included in this release. The following are some highlights from the 1.0.1 release notes.

Faster Compiles

The IDE now reuses compiled object files, when possible, to decrease compilation time. This includes the files which are pulled in through includes and by the IDE, so it can lead to some dramatic improvements (using the blink sketch, I saw re-compile time drop by about half).  No special actions are required to see this speed improvement.

Faster Code Uploads

The Preferences dialog now includes the option to disable verification on upload in order to decrease upload times. On my sample sketch, this trimmed upload time by roughly a third.  You can edit the Preferences dialog by selecting the Arduino menu, then clicking the Preferences… menu item.  Uncheck the Verify code after upload checkbox and click OK to see the speed increase.

The Return of Wire.write(0)

The Wire library now contains overloaded methods to support calling Wire.write(0) without needing to typecast the parameter.  This addresses a breaking change which was introduced in the 1.0 release.

Find / Replace Enhancements

The Find / Replace system has added the ability to find previous when searching. This can be accessed through the Find dialog, menu items, or keyboard shortcuts. The dialog has gone through some visual cleanup and now sports a checkbox option to wrap the search when it reaches the end of the document.  The Find dialog can be reached by selecting the Edit menu and clicking the Find… menu item.

Improved Accessibility for Serial Monitor and Log Panel

Changing the editor font size in the preferences dialog also changes the font size in the serial monitor and message console. You can edit the Preferences dialog by selecting the Arduino menu, then clicking the Preferences… menu item.  Change the text value for the Editor font size text box, click OK, and restart the IDE to see the font change.

Intelligent Text Selection

The IDE has gained some additional smarts when selecting text. To see this in action, double click on a word and start dragging the mouse. The selection will grow and shrink on word boundaries. Triple click before dragging and the selection grows and shrinks on line boundaries.

Enabling / Disabling Internal Pull-Up Resistors

The implementation of pinMode has changed in this release in regards to how the internal pull-up resistors are handled. Setting pinMode to INPUT now has the side effect of disabling the pull-up resistor. The new constant, INPUT_PULLUP, can be passed to pinMode to enable the pull-up resistor when setting the pin as an input.

Wednesday, May 23, 2012

Robotic falconry: winged unit lands on you!

Robotic falconry: winged unit lands on you!:

It doesn’t have four rotors, but this advanced-glider is every bit as impressive as the most complicated of quadrotor offerings. It’s the first glider that can successfully perch on your arm. We can’t help but think back to the owl in the original Clash of the Titans movie.
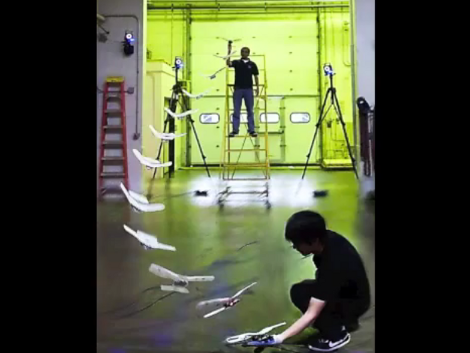
The team at the Aerospace Robotics and Control Lab of the University of Illinois at Urbana-Champaign is happy to show off the test flights they’ve been conducting. We’ve embedded two of them after the break which show the unit landing on this person’s arm, and on the seat of a chair. The image above shows a montage of several frames from the flight, and gives us a pretty good look at the articulated wings. You can seen them both bent in the middle of the flight to zero in on the landing zone. In addition to this there are flaps on the trailing edge of the wings and tail. The flight path is a bit wandering since the glider has no vertical tail to stabilize it.
Now if they can make it harvest power from overhead electrical lines they’ve got a spy-bird which can be dropped from a plane (or from a drone).


[via Technabob]

Filed under: robots hacks


ArduGate: controlling Arduino with web browser

ArduGate: controlling Arduino with web browser:
ardugate
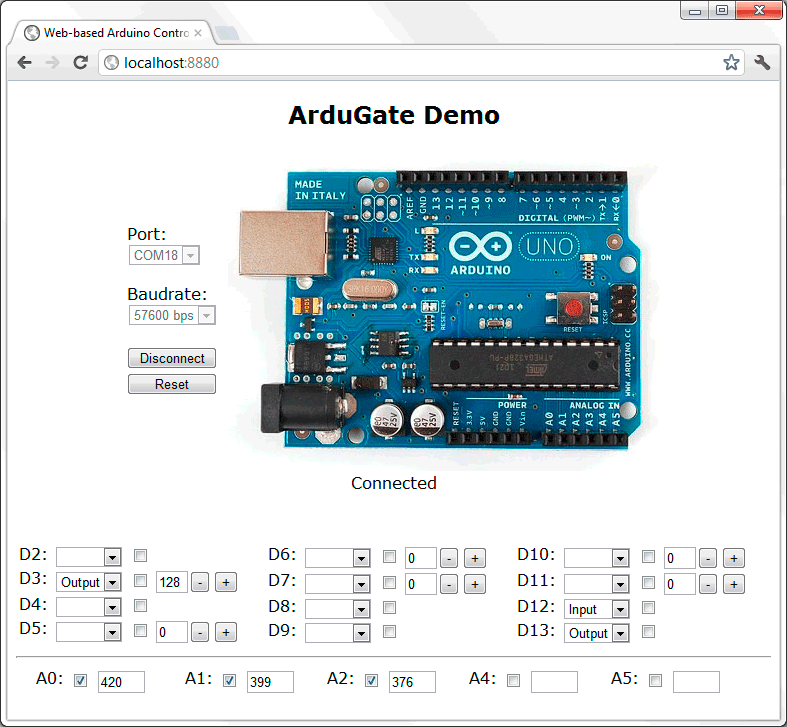
ArduGate: a web gateway for Arduino that makes possible to use JavaScript inside the web browser to interact with Arduino. Currently available just for Windows,  however, release for Linux and MAC OS X will be available soon.

SMT Soldering–It’s easier than you think!

SMT Soldering–It’s easier than you think!:
Smt Soldering Its Easier Than You Think En
SMT Soldering–It’s easier than you think!.
SMT Soldering–It’s easier than you think! is our new Manga Comic that shows you step by step tips and techniques for learning to solder SMT parts .

Tuesday, May 22, 2012

Scalable 12V solar power system and battery charge controller

Scalable 12V solar power system and battery charge controller:


Squonk writes about this scalable solar charger he’s located:


An unconventional, scalable high efficiency 12V solar power system and battery charge controller with low voltage cutout to protect the battery. (ideal for systems of 50W or less).
The most common solar charger consists of a Schottky diode to prevent the battery from draining into the PV panel and a shunt regulator that effectively short circuits the panel once the battery is fully charged.

One problem with this approach is diode losses and the resulting heat. If a 50W 12V panel supplies 4A to the battery, the Schottky diode will drop about 0,4V across it dissipating about 1,6W of heat. This requires a heat sink and loses power to heat. The problem is that there is no way of reducing the volt drop, paralleling diodes may share current, but the 0,4V will still be there. The circuit uses a MOSFET in stead of the usual diode and the primary power loss is resistive.


For comparison, a 40W PV system using the circuit below with IRFZ48 mosfets has a loss of about 1/4W on Q2. This means less heat and more power for your battery. More importantly though, MOSFETS have a positive temperature coefficient and can be paralleled to reduce the ON resistance. Unlike the diode system, the total power loss can be reduced.
The project details including BOM and schematic, and information on kit availability can be found at Opend hardware.
Via the contact form.

The Electron Turns 120

The Electron Turns 120:
This month is the 120th anniversary of electron theory! From Scientific American:
Electrons rule our world, but not so long ago they were only an idea. This month marks the 120th anniversary of a profound and influential creation, the electron theory of Dutch physicist Hendrik Antoon Lorentz. His electron was not merely a hypothesized elementary particle; it was the linchpin of an ambitious theory of nature. Today physicists are accustomed to the notion that a complete description of nature can rise out of simple, beautiful equations, yet prior to Lorentz that was a mystic vision.
For most physicists the memorable peak of 19th-century physics is the theory of electrical and magnetic fields, capped by James Clerk Maxwell’s mathematical synthesis of 1864. Then a haze settles, until the 20th-century massifs of relativity and quantum theory poke through. That foggy folk history obscures the bridge between—itself a brilliant achievement, built through heroic labor.


Lorentz’s achievement was to purify the message of Maxwell’s equations—to separate the signal from the noise. The signal: four equations that govern how electrical and magnetic fields respond to electric charge and its motion, plus one equation that specifies the force those fields exert on charge. The noise: everything else!
Now one had definite equations for the behavior of tiny bodies with specified mass and charge. Could one use those equations to rebuild the description of matter on a new foundation, starting from idealized “atoms” of charge? This was the burden of Lorentz’s electron theory. Starting with his 1892 paper, Lorentz and his followers used the electron theory to explain one property of matter after another—conduction of electricity and of heat, dielectric behavior, reflection and refraction of light, and more. Thus, they laid the groundwork for the subjects we now call electronics and materials science.

Man, stranded in the desert, makes a motorcycle from his broken car

This guy gets the golden MacGyver award!!!
-Bob

Man, stranded in the desert, makes a motorcycle from his broken car:

The original story is in French, and the Google translate is very rough. Please forgive us if we don’t get this completely accurate.
While traveling through the desert somewhere in north west Africa in his Citroen 2CV , [Emile] is stopped, and told not to go any further due to some military conflicts in the area. Not wanting to actually listen to this advice, he decides to loop around, through the desert, to circumvent this roadblock.
After a while of treading off the beaten path, [Emile] manages to snap a swing arm on his vehicle, leaving him stranded. He decided that the best course of action was to disassemble his vehicle and construct a motorcycle from the parts. This feat would be impressive on its own, but remember, he’s still in the desert and un-prepared. If we’re reading this correctly, he managed to drill holes by bending metal and sawing at it, then un-bending it to be flat again.
It takes him twelve days to construct this thing. There are more pictures on the site, you simply have to go look at it. Feel free to translate the labels and post them in the comments.
Update: From [Semicolo] in the comments

You got the translation right, but there’s not just a swing arm that’s broken, there’s a frame beam broken too (not sure about the exact term, one of the 2 girder of the chassis).

He’s not far away but he has a lot of tools and other hardware that could be stolen if he leaves them unattended.
[via Reddit]

Filed under: transportation hacks

Automatic capacitor charger lets you have fun with sparks

Automatic capacitor charger lets you have fun with sparks:

[GranTotem] is delighted by the sparks put out when a capacitor is rapidly discharged. But he’s not impressed at the relatively slow process of connecting them to a power supply for a recharge. So he built this auto-charging station for his capacitors that provides a shockingly good time almost continuously. Check out the video to see what we mean.
We always like to see the guts of the project, and that’s why we chose this image for the feature. But when everything is properly seated in the project box [GranTotem] has managed to achieve a really clean look. There are two barrel jack connectors on the end, one for 16V and the other for 20V inputs. The lid of the enclosure hosts an on/off switch, adjustment knob, and two banana connector terminals. Once switched on, a relay connects and disconnects the capacitor from the power supply at regular intervals which are adjusted by the knob. Just connect a couple of probes to those banana terminals and let the sparks reign down.


Filed under: misc hacks

The Engineer Guy explains how MEMS accelerometer chips work

The Engineer Guy explains how MEMS accelerometer chips work:

There’s a good chance that you use a MEMS accelerometer every single day. It’s the small chip that let your smart phone automatically adjust its screen orientation. They’re great chips, and since they’re mass-produced you can add them to your projects for a song (if you can abide the tiny packaging). But we have no idea of how they are made and only a inkling of how they work. [Bill Hammack] has filled that knowledge gap with this explanation of how MEMS accelerometers are made and how they function.
Our base knowledge comes from the acronym: Micro Electro-Mechanical Systems. There’s something in the chip that moves (so much for solid state electronics; and it makes us wonder if these wear out). [Bill] includes a diagram in his video after the break which shows the silicon-based system that moves as it is affected by gravity. This changes the capacitive properties of the structure, which can be measured and reported to a microcontroller for further use. The structure is built using an intricate etching process which we never want to try out at home.
Looking for a project in which to use one of these devices? We’ve always been fond of this POV device.


Filed under: misc hacks